If your bathroom is looking a little outdated or you just need a decor refresh, putting down new tile can make a big difference. But it’s not an easy job.
Porous tiles absorb water, which means they must be resealed regularly. Slate and limestone are common examples of porous tile materials. Getting a professional service from Milwaukee Bathroom Remodeling can save you time and money.
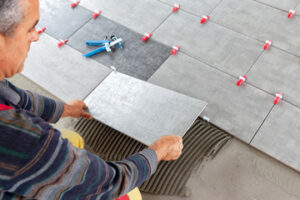 Laying The Tiles
As with any remodeling project, thorough preparation is critical to a good result. Depending on the state of your existing tile (or other surface you’re tiling over), this may mean patching or removing sections of damaged wall, repairing or replacing drywall, and filling in dents, voids, or valleys. Attempting to retile over loose or uneven existing tiles can cause them to shift or break. It can also prevent the new tile from adhering properly, leading to cracking or peeling.
Once the walls are prepped, it’s time to start laying your new tile. Aim to create a layout that maximizes the number of whole tiles and minimizes any size cuts you’ll need to make later on. You can do this by making a dry-fit, or mock-up, of your tile layout before you commit to applying the adhesive.
To do this, measure the height of one wall and divide it by two to create a center point (call it A). Mark this location along the wall with a pencil or chalk line, then repeat the process with the other perpendicular wall (call it B). Now mark a point where the intersection of these lines crosses on your floor—this will be your starting point for laying tile.
Before you begin tiling, apply a thin coat of thin-set with the notched side of your trowel. Spread the thin set evenly in broad curved strokes. Combing the thin set will create furrows that allow air to escape as the mortar sets, ensuring optimal adhesion.
After the thin-set has set, use a sponge to remove any excess that’s left on the tiles. This will prevent it from drying to a hard, unattractive film that can be difficult or impossible to remove later.
When you’re done, check the surface of each tile for bumps or dents and gently tap them with a mallet to level them. If you find any that aren’t perfectly flat, lightly press on them with a 2 x 4 to even out the surface before grouting. After grouting, wipe away any smears as they occur before they set with a damp sponge.
Preparing The Surface
It’s important to properly prepare the surface of the wall before beginning a new tile installation. If the wall is a new construction, this means removing any existing tiles and plastering the area. It’s also a good idea to lay a backer board on walls that will be covered with tile as this makes them thicker and stronger. If the wall is older, you will need to sand it to make it smooth enough for adhesive to bond with. This can be done with either a sanding block or a grinding disc, but you should act with caution as old tiles may contain hollow spaces. These areas are easy to spot by knocking on the wall and listening for a hollow sound. If you don’t spot these and install a new tile over them, they will likely collapse in the future.
It is never a good idea to tile over wallpaper as the finish is too smooth and shiny for adhesion to take hold. If you have existing wallpaper, remove it using the strip and sand method before applying an acrylic primer which will act as a seal on gypsum plasters and screeds before adding cement-based adhesives. It is also important to make sure that the substrate you are tiling is suitable for tiles, so always test them on a small area before beginning your tiling project.
Before you begin tiling, mark a line halfway between the floor and the top of the wall using a bubble level. This helps keep your first row of tiles straight and simplifies the rest of your tiling job. Once you’ve finished marking the area, use a tape measure to find the center of the room and dry-fit your tiles (with spacers) to check that they look straight.
A rubber grout flat is a handy tool to have as it allows you to fill in any gaps and divots between your tiles. It can also be used to clean up any excess mortar and help spread the tile adhesive evenly. Lastly, don’t forget to wear safety goggles and gloves when working with the abrasive materials involved in this type of project.
Adhesive
Using the right tile adhesive is vital for a wall-tile project. There are several different types to choose from, but all have similar characteristics. They are generally mildew-proof and formulated for use in areas where moisture is a factor.
One of the most common is the standard thin-set. It is made from a mix of cement, sand, and water retention agents. It is a good choice for walls because it locks out moisture, and it has the added benefit of being able to patch up minor surface problems such as cracks or holes. However, it is not as flexible or durable as epoxy mortar and is best suited for projects that will not involve much movement.
A modified version of the standard thin-set is available that contains liquid latex polymers, which improves its strength and flexibility and makes it suitable for areas where moisture is a factor. The latex additive also helps to extend the life of the tiles. It is important to note that if you are planning on installing a latex-modified thinset, it will need to be mixed with the standard version of the product for the best results.
Once the thin set is mixed, it is ready to be applied to the wall. The recommended method is to work in a small area to start with (beginners should stick to an area no bigger than a meter squared). Once the first area is covered, apply the tiles and ensure they are all fully adhered to.
Continue to work in small sections until the whole area is completed. It is advisable to leave any tiles that need trimming or cutting until the end of the job so you can do them with ease without having to lift and re-position other tiles.
As you complete each section, use a plastic spacer to maintain uniform spacing between tiles. It is also a good idea to install only full-width tiles, rather than trimmed ones, as this will make the final grout lines look more professional and neat.
Before applying the grout, it is a good idea to give the tiles a quick wipe with a damp cloth to remove any residual debris. This will help the grout to stick and prevent it from discoloring over time.
Grouting
Grout is the mixture that fills in the gaps between your tiles after they’re set. It helps keep dirt and debris from getting in between the tiles, and it adds rigidity and strength to the finished surface. There are many different types of grout available, and it’s important to choose the right one for your project. Grouts come in powdered form and are mixed with water to create a thick paste. They can be non-sanded (which is usually recommended for joints less than 1/8” wide) or sanded. Grouts also come in a variety of colors, which can either match or contrast with your chosen tile.
When you’re ready to begin grouting, remove all the tile spacers from your wall or floor. Mix your grout and scoop a trowel full onto the surface. Start at the outside edge of your wall and work toward the center. This will help ensure that you’ll have complete rows of tiles when you’re done. Continue to spread the grout over a 5- to 10-square-foot area, using the float held at a 45-degree angle to force the grout into the joints.
As you go, make sure to rinse the float often in a bucket of clean water. If the float becomes dirty, it can cause uneven grout coverage and it may be difficult to remove from your tiles. When the first section of grout is fully pressed into the gaps, use your sponge to wipe off any excess. Rinse and reload your sponge frequently, as well.
Once you’ve wiped off the excess, let the grout sit for about 15 minutes or until it starts to harden slightly. Once it has, use your sponge again to smooth out the joints, ensuring that there’s an even and consistent depth between each tile. Continue to swipe the tile surface, rinsing and changing your sponge as needed to avoid creating a clog.
Allow the grout to dry for 24 hours before you apply a sealer to prevent discoloration or to protect the surface from moisture damage. When you’re satisfied that the grout is sufficiently hard, apply a layer of sealer with a clean sponge.